Showing posts with label Homework. Show all posts

November 18, 2013

minty fresh


The chair at our desk in the study was my college desk chair from Walmart that I bought in 2006.  It's slim pickings in college station but I love how something functional back then is still stylish now.  Way to go Walmart:)  All it needed was a new color.

I chose a mint spray paint from Hobby Lobby that I had been eyeing for months, just waiting for something to paint. It's called Catalina Mist and it's beautiful. 


I de-glossed the chair and gave it a good sanding, then sprayed away.  We let it dry for several days before testing it out in the study.  


I love how it turned out and I'm pretty sure Joe is glad the hot pink is no more!  Isn't it crazy how a new coat of paint can spice things up?  Is there anything in your house that can use a new color?  If so, go for it and send me you before and after pics at getittogetherproorganizing@gmail.com


July 31, 2013

411

We spray painted a file hanger a while back, but wanted to add some more to this message center wall.  My mom handed down an old cookie sheet that we hung as a magnet board and I found this awesome chevron bulletin board from The Container Store.  Now information is more organized and easy to read, plus, these papers don't accumulate all over our house!!


April 18, 2013

fitting the mold


Now that the shelves are in, they didn't quite make it to the ceiling which is OK!  We wanted to add molding  from the beginning so they would look more built in rather than store bought.  The total space from the top to the ceiling was about 1 3/4".  


The sides of the bookcases protrude out just slightly farther that the middle section, so Joe cut some scrap board to fill in the space which allowed him to brad nail evenly without any gaps.  He attached the scrap board with wood glue.


Next, Joe cut the molding (sorry no pictures) using his miter saw and the Kreg molding guide (life saver!!) and then attached it with a brad nailer.


We ran into an issue with leveling because either the bookcase is crooked or the ceiling slants.  We decided to attach the molding along the bookcase and simply filled in the space between with more scrap wood and caulking.


Now all that's left is a fresh coat of paint. Stay tuned!!

April 11, 2013

top shelf

We have had the idea to add book cases in our study FOREVER!!!  The room needs a little somethin somethin and we needed more storage for books and things.  It was just a matter of making it to IKEA to get a great deal on their Billy Bookcases.  Just google Billy bookcases and tons of blogs pop up with great ideas on how to make them look built in....and we tried too:)


Here's the study before...don't mind our sweet arm lawn chairs:)


The bookcases were super simple to put together.  Well, I am assuming because Joe put them together one day while I ran errands.  I came home to this beautiful sight, so to me, super easy!!

Just to clarify  we had enough space to buy 2 standard bookcases and two extensions for each one so they almost reach the ceiling.


We cut the floor board using a grinder so that we could get a snug fit as close to the wall as possible.  This process was intimidating but we finished in a couple of hours.  We just cut the caulking with a blade and used a hammer to pry apart the board from the wall which made easy access to slice the board in the right spot.  

Vacuuming down there was so satisfying!!!  Gross how many creatures can fit into those tiny spaces so we even sprayed the area a little too!  Take that!!


We goofed and cut the back base boards too which was unnecessary because the bookcases allow for floor boards on the back...oh well.  We even had to cut our window sill too!


The bookcases fit almost perfectly and Joe caulked the outlines so they look seamless to the wall.


Before caulking, however, Joe painted the back wall mint.  We chose not to use the backing that came with the shelves because we wanted that spare inch of room for larger books and things.  We do think that using the back would make it look more built in though:)


Here's how they turned out!!  I can't tell you how much it adds to the room...there's color, height, and lots of storage!  It felt good to get rid of 3 boxes of books:)  Next on the agenda is to add molding to the tops. Wish us luck!!


January 28, 2013

paper problems

I can't believe how much paper just 2 people can acquire in our house.  From bills, to mail, to school work, to church pamphlets, it REALLY adds up!  And where does it add up?  ALL OVER!  We have stacks of paper on the stairs, the kitchen table, the island, and on the desk.  I have a file box where we keep important documents but we really didn't have a solution for short term papers.


I knew i wanted to dedicate this wall in the kitchen to some sort of paper organization/message board.  I like this spot because you can't see it unless you are standing near our stove looking back at the living room.  I had my eye on these beautiful hanging file sorters from Pottery Barn but they were over $50!  I was shopping with my mom when I spotted this cutie at Home Goods for only $20!  It came in red, blue and green but I really wanted it to be neutral so we spray painted it with some stainless paint we had left over from another project.  I covered the label holders with painters tape and sprayed to my hearts desire:)


It took a couple of days to dry but it turned out great!  It really compliments our gray cabinets and dark island.  Joe hung it up using some sturdy anchors in case we load it down with too many papers.  There are actually enough slots for 6 sections of papers so we broke it down like this:
Joe
Casey
To Do
To File
Urgent
Mail


It took some getting used to, but now we are in the habit of sorting through the mail and putting it in the file.  I am able to pick up stacks of paper and put them here until I have more time later to organize it.  I love the piles on the wall and off our counters!  In the future I hope to find some cool magnetic chalk boards to put on the right hand side.


January 25, 2013

pocket planner

before
I look forward to that time every year when I get to replace my planner:)  Yes, I know I could have an electronic planner on my phone or computer, but there is satisfaction is handwriting a to do list and watching it cross off! 

The inside covers, front and back, of my planners collect items such as insurance cards,  reflections, pictures, Save the Dates, receipts, and appointment reminders.  It was getting to the point where I would have to carry my planner carefully so as not to lose any contents inside.

I saw this tip on Martha Stewart.com to paste an envelope on the inside covers to serve as pockets.  What a great idea!  

I picked out two envelopes from my stationary collection and glued them to the covers using craft dot glue and an Elmer's glue stick.  Now these fly away papers are neatly held in, just where I like them:)

after

after

January 24, 2013

the one thing i hoard


Football made a change in me...it taught me to save receipts.  Before, I never held on to receipts, I was fine with store credit and all my bank information was online.  I did not want to have to keep a handle on all those little pieces of paper.

Then we moved to Seattle, and Texas, and Seattle and Texas and then Jacksonville and Texas while Joe was playing football.  We really lived by the seat of our pants and couldn't rely on being in one place for too long.  Enter anxiety about returning things without receipts!  The more we could return the less money we spent hauling it back home.

The success story really came in Jacksonville.  We rented a loft for about a month and bought things like a microwave, rugs, a TV, etc. and then plans changed and we were going back home.  I had kept all our receipts in a  tiny a little pile and boy did it save me some stress...and money!

Since then I've never looked back, well until recently when my receipt drawer wouldn't close.  I bought a small file folder in the Target dollar bin and went to work tossing old receipts (don't keep receipts for more than 6 months to a year) and then sorted them into like categories. 


I labeled the tabs in order of most often used:
Target
Home Depot/Lowe's
Hobby Lobby
Home (World Market, PB, BBB)
Furniture
Office (Office Max, Best Buy, Barnes & Noble)
Health and Beauty (places like Ulta, Bath and Body Works)
Sports (Academy)
Auto
Joe (Clothes and personal items)
Casey (Clothes and personal items)


After filing all my receipts, I thought the folder was a little boring so I simply glued a green button on the front...tiny I know, but it makes me smile every time I file a receipt:)


On Monday, a receipt saved me on a piece of furniture I bought back in MAY! I took it back and got full credit!  Woohoo! What do you do with your receipts??

January 10, 2013

photo shop

Helen Byrd - Photographer
So a year ago, Joe and I visited our good friends in Midland, Sam & Helen!  We spent New Year's Day and then some at their new house they purchased just before they married last March.  While Sam and Joe went to Sam's work on Monday, Helen and I had a ton of fun organizing her office.  

Helen is an amazing photographer with tons of clients that keep her busy year round. She took our pictures in our new house this summer, you can see those here on her blog, helenbyrdblog.com, we absolutely LOVE them...and her!

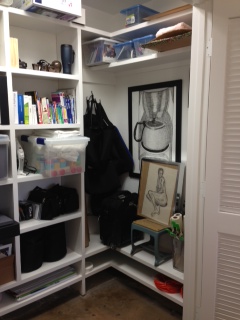
 With a successful photography business comes tons of photos, equipment, etc. so she wanted to get organized. And organize we did.  We spent the day unpacking boxes and getting rid of things she didn't need.  We grouped things together in categories and then decided where they would be most functional for her.  What a great office space to work with!  Tons of cabinets, white walls, and a fabulous closet!  Here's how it turned out....

Our time in Midland was short so Helen finished this project without me.  Here are her comments and after pictures below....you can totally tell who is behind the camera:)  I obviously need some lessons!!
office before


After


Before
After

Before
After
Before


 "There wasn't another place in the house to keep the gun safe, so it lives in the office closet - it's actually ok because I can put old hard drives in there for safe keeping." 


After

Before
Before
 "All of the large prints are stored on a repurposed poster board rack. a store was going out of business and i snagged the wire rack for $5."


After
"The wall with the wire is sort of a giant productivity board. It helps to have such a simple list of client needs. During the summer and fall most of those wires are totally filled up! (although i'm thinking i need to hang something else on that wall - right now it works!)" 

After
 "Luckily there was an outlet in one of the cabinets, and since the printer is wireless it's now hidden away. Before it was on the counter top with the modem... that counter top is so much more functional now!"


After
 "There was no other place in the room to put the phone/modem/router, so I hid it in the old camera box. It makes the space look so much better!" 


After

Hide and seek!
"I taped a few things (coupons, important numbers i can get to quickly) on the inside of one cabinet door - they are easily accessed and not in the way."


Copyright 2012 Get It Together Pro Organizing